Showing posts with label side dish. Show all posts

Wednesday, April 24, 2013

Pizza Monkey Bread


When my family gets together we love to ask each other questions like "If you could live anywhere in the world, where would it be?" or "if you could pick your real dream job, not having to worry about making enough money etc, what would you do?" or "what is your honest opinion about ."

It makes for some riveting discussions and I always end up learning something new about the very people who I grew up with.  One day someone (probably me) asked, "if you had to eat one food for the rest of your life, what would it be?"  Tough question!  Especially for a person who essentially likes everything, with the exception of goat cheese, I know, I know.

But truth me told, I'd have to say pizza.  Not a very foodie answer, but I've got to be honest.  I LOVE pizza.  And I love how versatile it is, there are endless combinations which would keep it from ever getting boring.  Plus, I mean, c'mon, it's pizza.  It's hot, gooey, comforting, full of flavor, and always ready for a party. 

I got really excited when Barbara from Barbara Bakes posted her Pizza Monkey Bread.  Not only does it have all the great elements of a food I already love, but it's in a different and fun form that kids love.  Who wouldn't want to tear off a piece of this and dunk it into it's warm, homemade marinara.  It really is a party.

Click here for the original recipe and for a great video on how to make them.  Enjoy!


Wednesday, February 27, 2013

White Beans with Prosciutto

For dinner it always seems like I work really hard on a main dish, but then my side dishes always end up being...how you say...LAME.  It usually ends up being a mess of veggies roasted on a cookie sheet, or on my most desperate nights, some medley from a can or frozen bag.  I let it pass on the merit that we actually have some sort of green on our plate at all, but sometimes it's nice to have a thought out side dish to really complete the meal.

I rarely serve beans as a side dish, which is a shame, because they're awesome.  They're creamy, filling and lend themselves to a ton of possibilities.  I loved these white beans with prosciutto.  They are packed with flavor, but aren't too overpowering to sit alongside the main course.  The fresh herbs and white wine make them taste very fresh and bright, with just a hint of smoky/salty from the prosciutto.  Enjoy!

White Beans with Prosciutto
From The New Way to Cook Light

Ingredients

2 teaspoons extra virgin olive oil
1/4 cup finely chopped red onion
2 teaspoons minced fresh garlic
1/2 teaspoon minced fresh rosemary
2 tablespoons dry white wine
3 tablespoons fat-free chicken broth
1/4 teaspoon black pepper
1 can cannellini beans, rinsed and drained
2 tablespoons chopped fresh parsley
1 ounce thinly sliced prosciutto, chopped

Directions

Heat a large skillet over medium heat.  Add oil to pan; swirl to coat.  Add onion to pan; saute 2 minutes.  Add garlic and rosemary; saute 30 seconds.  Add wine; cook until liquid evaporates.  Add broth, pepper, and beans; cook 3 minutes or until beans are thoroughly heated.  Stir in parsley adn prosciutto.

Serves 4: 1 serving is 1/3 cup

Per Serving: 94 cal, 31g fat, 5.9g prot, 10g carb, 2.9g fiber


Wednesday, February 13, 2013

Pumpkin Cornbread Muffins


Is there anything better than a chunk of warm cornbread next to a hot bowl of full flavored chili?  Especially when the cornbread is slightly sweet, soft in texture, and the perfect palate for butter, honey, or jam?  Nope, there really is nothing better!  (Well, except maybe a Swedish massage or an all expense paid trip to Tahiti, but let's focus on the simple things.)

I made this to accompany the delicious Chicken Barley Chili I featured in my previous post.  It was the perfect side kick to the robust flavors.  The pumpkin really does something to the flavor of the cornbread, not to mention the beautiful orange hue it gives.  And forget about dealing with anything dry or crumbling, these are so soft, you could eat them plain, I did!

This whole meal was a total kid pleaser!  I fed five kids with this and every single one of them ate everything, some even asking for seconds.  Definitely a keeper.

Pumpkin Cornbread Muffins
By Nancy Creative

Ingredients

1 cup all-purpose flour
1 Tablespoon baking powder
1 teaspoon salt
1/2 teaspoon ground cinnamon
1/4 teaspoon ground nutmeg
1/2 cup light brown sugar, packed
1 cup yellow cornmeal
2 large eggs
1 cup pumpkin puree
1/4 cup plain yogurt 
1/4 cup canola oil
1 Tablespoon molasses
1/2 Tablespoon honey

Directions

Preheat oven to 375 degrees F. Grease an 8�8? baking pan or line a 12-cup muffin pan with paper liners.

In a medium bowl, mix the flour, baking powder, salt, cinnamon, nutmeg, brown sugar, and cornmeal (using a whisk to blend these ingredients works well); after blending ingredients well, set aside.
In a large bowl, beat eggs, then stir in the pumpkin puree, plain yogurt, canola oil, molasses, and honey.

Stir the wet ingredients into the dry ingredients just until combined. Pour batter into the greased 8�8? baking pan, smoothing the top, OR spoon batter into 12 lined muffin cups (each cup should be about 2/3 full of batter).

Bake CORNBREAD (in 8�8? pan) at 375 degrees for 22 to 25 minutes, or until toothpick inserted in center comes out clean or almost clean (be careful not to over-bake cornbread, or it will be too dry).

Bake CORNBREAD MUFFINS at 375 degrees for 14 to 15 minutes, or until toothpick inserted in center comes out clean or almost clean (do not over-bake, or muffins will be too dry and may brown on the bottom).


Monday, January 21, 2013

Buffalo Chicken Pasta Salad


I'm going through a bit of a Buffalo Chicken obsession right now.  If it even slightly resembles the flavors of the classic chicken wing, I have to have it, or pin it :)  Who in the world though that chicken, drenched in hot sauce, smothered in blue cheese would be so good?  I don't know, but I sure would like to give whoever it was, one heck of a high five.

I found this wonderful salad on Shelbys page a few months ago and I've been in love ever since.  I've been known to whip up a huge bowl, and enjoy it for lunch every day until it runs out.  And I'm always sad when that day comes.

The flavors of this salad go so perfectly together.  The sauce has a great kick, thanks to the hot sauce and is balanced out with the pungent blue cheese.  It's spicy, but not too spicy for kids.  It's creamy, it's crunchy, and it really hits the spot when you need a savory dish full of flavor.  It's the perfect side dish for pot lucks and picnics, even if they are on your living room floor in front of the TV :).

Buffalo Chicken Pasta Salad
By Grumpy's Honey Bunch

Ingredients

8 oz dried rotini pasta, cooked according to package directions
2 stalks celery, diced
1 green onion, thinly sliced, including green top
1/3 cup roasted red pepper
2 cups cooked chicken, cubed (I used canned chicken once when I was in a hurry, it turned out great)
1/2 cup Mayonnaise (I used low-fat)
2-3 tablespoons Frank's Red Hot Sauce (use according to taste, I like a lot, but if you're feeding a crowd, you may only want to do 2)
1 teaspoon Worcestershire Sauce
1 tablespoon roasted red pepper brine (the juice the peppers are in)
2 tablespoons crumbled Gorgonzola cheese

Directions

Mix pasta, celery, onion, roasted red pepper and chicken in large mixing bowl.  Set aside.

Mix together Mayonnaise, hot sauce, Worcestershire sauce, red pepper brine and crumbled Gorgonzola cheese. 

Toss mayo mixture with pasta mixture and chill.  Enjoy

Monday, October 29, 2012

Cooking with my Blog Friends

How are you east coasters doing so far?!  Right now my kids and I are hunkered down in the living room with flashlights strapped to our foreheads, waiting for the eye of the storm.  I've got a pile of blankets, a bunch of candles and two loaves of bread.  That's what they tell you to stock up on for huge tropical storms, right?  So far it's just pretty nasty and drizzly, and I'm hoping that it doesn't get worse than that.  Unfortunately, I think it's probably wishful thinking.

Speaking of storms, I've been a tornado in the kitchen lately.  My schedule has me at home a lot more, and to keep myself occupied, I've been tackling so many of the recipes all of you have been putting out.  Each and every one has been a complete hit in our home, and they are all perfect for fall, especially if you need something to distract you from oncoming hurricanes!

All of the pictures below belong to the blogger who posted them.  They are not mine.


Taste and Tell: Homemade Tator Tots (Perfect for your leftover mashed potatoes.)


Mel's Kitchen Cafe:  Ultimate Beef Stroganoff (As you may have noticed, I've currently got a bit of a  crush on Mel's blog.  She can do no wrong!)


Stay safe east coasters!  We'll get through this together!

Thursday, October 25, 2012

Pepper Jack Pasta Salad


Considering how often I make this, it's a wonder that I haven't posted it before.  This has become my absolute favorite "go-to" side dish for parties, barbecues, or if I just want to eat it for lunch all week (which happens, often).  This salad is packed with a delightfully tangy punch, and for some reason, I just love eating those little tiny Acini Di Pepe.  They tickle my mouth!  It makes me giggle!

Pepper Jack Pasta Salad
Adapted from Cooking Light April 2009

Ingredients

6 ounces uncooked acini di pepe pasta (about 1 cup)
2 1/4 cups diced plum tomato (about 14 ounces)
1/3 cup capers, rinsed and drained
1/4 cup finely chopped red onion
1/4 cup sliced pickled banana peppers
1/4 cup chopped fresh parsley
2 tablespoons cider vinegar
1 tablespoon extra-virgin olive oil
1/2 teaspoon dried oregano
1/8 teaspoon salt
2 ounces Pepper Jack cheese, cut into 1/4-inch cubes
1 (16-ounce) can navy beans, rinsed and drained
1 ounce salami, chopped
1 garlic clove, minced

Directions

1.   Cook pasta according to package directions, omitting salt and fat. Drain.

2.   Combine tomato and remaining ingredients in a large bowl. Add pasta to tomato mixture, tossing well to combine.


Monday, November 28, 2011

Turkey Fried Rice


I survived the day of indulgence, well, attacked is probably a better word. I definitely let myself have the day off and it was glorious. It's amazing the things you realize that you miss, like dark meat, and sour cream, and good old SUGAR. Needless to say, we had a very delicious day, but I'm happy to be back on the Livefit wagon.

This is a recipe that's come in handy quite a few times. One of the most important parts of our meals is that we're getting in the right balance of protein, complex carbs and veggies. This dish covers it all in one big skillet, and it's so delicious and filling. Brown rice with egg whites and ground turkey. It might not sound as appetizing as the real thing, but it's flavored so well that I honestly couldn't tell much of a difference. The kids loved it and it's very filling. Go ahead and use chopped up leftover turkey if you still have some in your fridge.


Turkey Fried Rice
Adapted from The Best of Clean Eating from Clean Eating Magazine

Ingredients

1 teaspoon plus 1 tablespoon olive or safflower oil, divided
1 lb lean ground turkey
fresh ground black pepper, to taste
2 teaspoons plus 2 tablespoons low sodium soy sauce, divided
1/2 yellow onion, sliced thinly
1/2 red bell pepper, finely chopped
1 carrot, peeled and finely chopped
1 bunch broccoli, cut into bite sized pieces (1 cup)
1 tablespoon grated fresh ginger
sea salt, to taste
3 minced garlic cloves
1/2 cup frozen peas, thawed
3 cups cooked brown rice
4 egg whites (or two regular eggs)
1 tablespoon fish sauce (optional)
1/4 cup thinly sliced green onions
fresh cilantro for garnish
chile sauce for garnish

Directions

In a very large nonstick skillet or wok, heat one teaspoon oil over medium high heat. Add turkey and break up to form a single layer in pan, season with pepper. Brown meat, stirring occasionally until cooked through, three to five minutes. Stir in two teaspoons soy sauce. Remove turkey and set aside.

Return skillet to stove and add remaining tablespoon of oil. Add onion, red pepper, carrot, broccoli and ginger and season with salt and black pepper. Cook over medium-high heat until vegetables are slightly soft, about five minutes. Add garlic and cook for two more minutes.

Stir in peas and rice, and cook until completely heated through, about five minutes.

Push rice mixture over to one side of pan and add eggs to now empty side. Allow eggs to fully cook, stirring occasionally, three to five minutes, and then stir eggs into rice mixture.

Add turkey and any accumulated juices to skillet. Stir in fish sauce, remaining two tablespoons soy sauce and green onions. Garnish with cilantro and chile sauce if desired.

Wednesday, August 10, 2011

Quinoa Pilaf with Pine Nuts


I think one of the best things about our summer at home were the family dinners. Every night my mom and I would decide what we were making, and my siblings came over just about every time to eat with us. It was so much fun and made all the preparation so worth it.


One of my mom's trademark side dishes is this quinoa pilaf, a recipe that she got from Ellie Krieger's cookbook. Now, I knew that quinoa was the new thing, I understood how good it is for you and how all the cool foodies are chomping it down these days, but I just hadn't gotten there yet. I found it too bland, too grainy, I don't know, just too quinoa-y.


I'm now a believer.


I could eat this pilaf all day long. It's nutty, it's soft, and has such a great flavor. I think one of the best parts about it is the fresh parsley. It adds a wonderful brightness to an earthy grain that goes just beautifully. If you don't think you're quite sold on quinoa yet, I really urge you to try this, you just might change your mind.


Quinoa Pilaf with Pine Nuts

Ellie Krieger


Ingredients


2 cups low-sodium chicken broth

1 cup quinoa, rinsed

1/4 cup pine nuts

1 tablespoon olive oil

1/2 large onion, chopped

1/3 cup chopped fresh parsley leaves

Salt and pepper


Directions


Put the broth and quinoa in a medium sized saucepan and bring to a boil. Reduce heat to a simmer, cover and cook for 15 to 20 minutes, until liquid is absorbed and grain is tender.


Meanwhile, toast the nuts in a large dry skillet over medium-high heat until golden brown and fragrant, about 2 minutes, stirring frequently. Remove nuts from pan and set aside. Heat the oil in the same skillet over a medium-high heat. Add the onions and cook stirring occasionally, until the onions soften and begin to brown, about 6 minutes.


When the quinoa is done, fluff with a fork and transfer to a large serving bowl. Stir in the pine nuts, onions, and parsley. Season with salt and pepper and serve.


Thursday, June 2, 2011

Corn and Black Bean Salad


I feel like after blogging for over three years, you're allowed throw in a repeat every now and again, especially if it's as good as this salad.

This is probably more of a dip then a salad, but really it can go either way. While it's probably served best as an appetizer or party food, I'd be perfectly happy eating a big bowl of this stuff for lunch, just throw in some whole grain tortilla chips and you've got one flavorful and nutrient packed lunch. This would also make a great addition to your taco salad, nachos, burritos or tacos. Gosh, I already want to make this again!

Corn and Black Bean Salad

Ingredients

2 cans black beans-drained and rinsed
2 can corn-drained
1 red onion chopped
2 avocados chopped (I omitted avocados this time around, but it is good)
1 red pepper chopped
1 yellow or orange pepper chopped
2 cups cherry or grape tomatoes halved
1/2 cup chopped cilantro

Vinaigrette
2 TB lime juice (fresh if possible)
2-3 tsp chili powder
1-2 tsp salt (kosher salt if you have it)
1-2 TB olive oil

Directions

When chopping veggies, try to make them as uniform in size as possible.

Combine all of the veggies, including cilantro, in a large bowl. In a small bowl combine lime juice, chili powder and salt. Then, whisk in olive oil to desired consistency, there won't be a lot of dressing, but it will be STRONG. Add dressing to salad and toss well. Serve with tortilla chips, those Scoops chips are great with this salad.

Sunday, May 1, 2011

My Favorite Pasta Salad


People always say that summertime is a good time to lose weight. Since it's hot out, your appetite lessens, and everyone would rather munch on fruit and veggies instead of rich soups and casseroles.

And it makes sense, but somehow summer still ends up being the toughest season for me to maintain my weight. And the reason is that I'm such a sucker for those delicious potluck and barbecue foods. Potato salad, pasta salad, apple pie, lemon bars, cheeseburgers and hotdogs grilled over charcoal, the list goes on. Give me a plate of that goodness, combined with awesome friends and a warm summer night, and life truly doesn't get better. I'm already looking forward to it, I just might have to replace the extra potato salad with a juicy slice of watermelon instead.


This pasta is one of my summer faves. It's so easy to make, keeps for several days and is delicious either cold or room temp, making it a very convenient picnic item. You have most likely had a version of pasta salad similar to this, but I had to post this anyway because it's just so dang good.


Pasta Salad

Ingredients

2 packets Italian Dressing, prepared according to directions, I used the less oil option (using the stuff from the packet vs. the bottle really does make a difference, it's worth the extra step!)
1 lb tricolor pasta
8 oz salami, diced
8 oz provolone or pepperjack cheese, diced (I used provolone for this, but next time I will use pepperjack, I like a good kick)
8 oz cherry tomatoes, halved
1 red bell pepper, chopped
1 green pepper
2 cans olives, sliced

Directions

1. Cook pasta according to directions, drain and cool.

2. Combine all ingredients and toss well. Keep chilled, it tastes best after it has a few hours to sit and blend flavors.

When is it hardest for you to eat healthy. Any tips on maintaining during those times?

Monday, April 18, 2011

Mini Quiches


I always think about quiche this time of year. Maybe it's the eggs, representing Easter. Maybe it's the bright yellow color representing spring. Either way, I'm not complaining because quiche is awesome!

I made these sweeties for a baby shower. I have a thing about turning food mini and these little quiches are much easier to make then you think. A store bought pie crust helps a lot, just line your mini muffin tins with a cut out piece of pastry, fill and bake! They're the best warm, but also taste great at room temp, making them perfect for say an upcoming Easter Egg hunt, or brunch you have coming up!


Mini Quiches
Adapted from Food.com

Ingredients

2 sheets store-bought pie crust
6 slices bacon, diced
1 onions, finely diced
6 eggs
1 cup cream
1 cup grated cheese, I used sharp cheddar
1 tablespoon chopped fresh parsley (I used fresh)
salt & freshly ground black pepper

Directions

1. Cook the onion and bacon over a low heat until the onion is softened.

2. Allow to cool a little.

3. Mix together with the eggs, cream, cheese, parsley and salt and pepper.

4. Unroll pie pastry, dish with flour and roll with rolling pin until it's increased in size by about a third. Using a cookie cutter or glass, cut 12 circles from each pastry sheet.

5. Use these to line a greased mini muffin pan.

6. Place about 2 teaspoons of the egg and bacon mix in each pastry base.

7. Bake in a moderate oven for about 12 minutes per tray (or until puffed, golden and set).

8. repeat with remaining pastry sheets and mix.


My kids made paper crowns for their little bunnies, they're so dang cute!

Tuesday, April 12, 2011

Coconut Chicken Fingers


I had made a brief mention of these a week or so ago when I was in utter despair over my lost cameras. But as you know, the camera crisis had a happy ending and now I can give this chicken the credit it deserves.

My family doesn't like shrimp. None of them. I know. But, trooper that I am, I've learned to curb my shrimp cravings with similar substitutes like this fabulous coconut chicken.


This was the perfect meal to also experiment with my new olive oils that I received from Foodbuzz. When I was younger I had no idea that different oils served different purposes. I'm pretty sure I used olive oil in cake mixes several times. And while it probably wouldn't ruin your dish to use a less suitable oil, certain oils are best put to use in different things. The light olive oil is best for frying and baking, extra virgin for dipping, dressings and sauces, and pure for grilling, sauteing and marinades. I definitely learned something!


So I decided to have an oily night (yeah, oily just isn't a good adjective, even when you understand the context, but I digress) by using the light oil to shallow fry my chicken, and the pure oil to saute my peppers. They both turned out wonderfully. The chicken was sweet, crispy and a total family pleaser. The peppers were done simply, sliced and sauteed with salt and pepper, also sweet and crispy, a perfect side for the chicken.


Coconut Chicken Fingers
Cooking Light 2011

Ingredients

4 (6-ounce) skinless, boneless chicken breast halves, cut into 1/2-inch-thick strips
1/2 teaspoon salt
1/4 teaspoon ground red pepper
1 cup rice flour
1 cup whole buttermilk
1 large egg
1 1/2 cups unsweetened flaked coconut
3 tablespoons canola oil
Sweet chile sauce (optional, but I highly recommend it!)

Directions

1. Sprinkle chicken with salt and pepper. Place flour in a shallow dish. Combine buttermilk and egg in a shallow dish, stirring well. Place coconut in a shallow dish. Dredge chicken in flour; shake off excess. Dip chicken in egg mixture; dredge in coconut.

2. Heat a large skillet over medium-high heat. Add oil to pan; swirl to coat. Add chicken to pan; cook 6 minutes or until done, turning to brown. Serve with chile sauce, if desired.

Serves 6

Per Serving: 298 cal, 12g fat, 28g prot, 1g fiber

Thursday, March 10, 2011

Mashed Sweet Potatoes


When I was younger, the sweet potato rarely made an appearance in my life. I might see a candied yam once a year for Thanksgiving, but that was the closest I ever got to this orange spud. In fact, just this last year is the first time the sweet potato has become a common staple in our household, and thank goodness too! Not only is it versatile, sweet and totally delicious, it's also a fantastic source of fiber, and vitamins A, B, and C. Definitely something I can get behind, especially when I see my kids snarfing them down.

If you think regular mashed potatoes are a snap to make, just wait until you try these out. They take less time, require less work, and unlike regular mashed potatoes, they reheat really well (is it just me, or are regular mashed potatoes super gummy and dry the second time around). This is a fantastic side that will add a lot to your meal. Give the sweet potato a try!


Mashed Sweet Potatoes
By America's Test Kitchen Healthy Family Cookbook (yes, I know I get redundant with my sources, but hey, when it's good, it's good!)

Ingredients

2 pounds sweet potatoes (4 small or 2 big) peeled and sliced 1/2 inch thick
1/3 cup water
1 teaspoon fresh thyme (I used dry)
1 teaspoon sugar (I used Splenda)
salt and pepper
6 tablespoons half and half warmed (I used fat-free)
1 tablespoon butter, melted

Directions

1. Combine the sweet potatoes, water, thyme, sugar, and 1/2 teaspoon salt in a large saucepan. Cover and cook over low heat, stirring occasionally, until the potatoes fall apart easily when poked with a fork and all of the liquid has been absorbed, 25 to 30 minutes (it look much less time for me, so check them often!)

2. Using a potato masher, mash the potatoes until just a few small lumps remain. Stir in the half and half and butter, season with salt and pepper to taste, serve.

Serves 6

Per 2/3 cup serving: 170 cal, 3.5g fat, 32g carb, 3g prot, 5g fiber

Saturday, February 19, 2011

Twice Baked Potatoes


Just like a lot of us out there, I've been trying to eat healthier. And after YEARS of all sorts of diets and weight roller coasters, I've made some pretty strong decisions on what I am and am not willing to do to stay healthy.

I AM willing to eat more fruits and vegetables.

I AM NOT willing to eat grilled chicken and steamed vegetables every night for dinner.

I AM willing to eat those Arnold Sandwich thins and less bread and carbs.

I AM NOT willing to cut carbs like pasta and bread out of my diet completely.

I AM willing to put less cheese on my food to cut calories.

I AM NOT willing to cut cheese out of my diet, or buy that disgusting fake cheese to substitute.

I AM willing to eat one cookie, instead of three, and not beat myself up about it.

I AM NOT willing deprive myself of small portions of sugar, chocolate and all the wonderful treats that add joy to our life.

I AM willing to make positive lifestyle changes that will provide me with variety and a change in how I look and feel.

I think Joanne from Eats Well with Others (seriously one of the cutest and most hilarious food blogs ever, I adore this girl), who is also trying to eat healthy said it best when recommending that we keep a good variety in our diet so we don't get bored. This has probably been the best advice for me thus far, and the good news it that it's working!

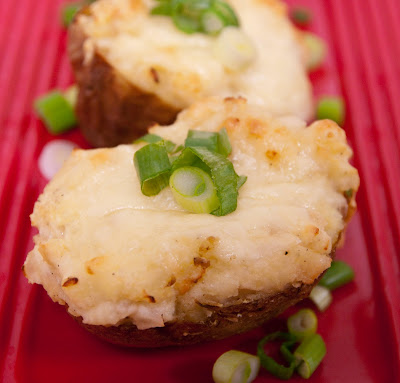
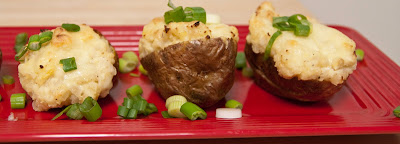
So when I found these twice baked potatoes, I didn't scream and shield my eyes from the gloriously starchy, carby, cheesy pictures in horror. No more deprivation in my diet, just moderation, and I was sure to savor every bite! Not only are they delicious, lightened and beautiful, but they're also a lot of fun to make, and easier then they sound. My one piece of advice is that you are careful with your dried mustard. I think I went a bit overboard and it made them a lot sharper then I would have liked, but otherwise they are just delicious and a really fun side for so many things.

Classic Twice Baked Potatoes
America's Test Kitchen Healthy Family Cookbook

Ingredients

4 russet potatoes, about 8 oz each, scrubbed and dried
1 teaspoon canola oil
1 tablespoon unsalted butter
1 onion minced
1 garlic clove minced
1 cup shredded sharp cheddar cheese
1/2 cup lowfat sour cream
1/4 cup skim milk
1/2 teaspoon dried mustard
salt and pepper
scallion, sliced thin

Directions

1. Adjust the oven racks to the upper-middle and middle positions and heat the oven to 400 degrees. Rub the potatoes with the oil, place directly on the upper oven rack, and bake until the skins are crisp and deep brown and a skewer easily pierces the flesh, about 1 hour, flipping them halfway.

2. While the potatoes bake, melt the butter in a 10-inch nonstick skillet over medium heat. Add the onion and cook until softened and lightly browned, 5 to 7 minutes. Stir in the garlic and cook until fragrant, about 30 seconds. Transfer to a bowl and cover to keep warm.

3. Transfer the potatoes to a wire rack and set over a foil-lined rimmed baking sheet and let cool slightly, about 10 minutes. Increase the oven temperature to 500 degrees.

4. Following the photos on page 145, cut each potato in half lengthwise through the narrow curved side. Using an oven mitt or an folded kitchen towel to hold the hot potatoes, scoop the flesh from each potato half into a medium bowl, leaving 1/8-inch thickness of flesh in each shell. Transfer the potato shells back to the wire rack.

5. Mash the potato flesh with a potato masher or fork until smooth. Stir in 1/2 cup of the cheddar, sour cream, milk, dry mustard, onion-garlic mixture, 3/4 teaspoon salt, and 1/8 teaspoon pepper. Spoon the mixture into the potato shells, mounding it slightly at the center. Sprinkle with the remaining 1/2 cup cheddar.

6. Bake the potatoes on the middle rack until the shells are crisp and the cheese is melted and spotty brown, 10 to 15 minutes. Sprinkle with the scallions and serve.

Serves 8: 1 serving is 1 potato half

Per Serving: 190 cal, 8g fat, 25g carb, 7g prot, 2g fiber, 320mg sod

What are some of your healthy eating rules?

Friday, February 4, 2011

Homemade Balsamic Vinaigrette


Check that baby out! My sweet husband got if for me for Christmas after I told him to after a few weeks of flirtatious hinting and winking. Anyway, it's a fun dressing mixer, specifically for vinaigrettes, squeezing the handle on the side emulsifies the oil and vinegar. It even has recipes on the side with the measurements included, making it so easy to throw a delicious dressing together. Is is essential to make your own vinaigrettes? no. Does it provide hours of super fun entertainment, especially during these cold winter days? you know it!

The first time I used my fun new contraption, I made was balsamic vinaigrette. I've had plenty of balsamic vinaigrettes in my day, and while I like them, I've never LURVED them or anything. Well, I do now!

I don't know what it was about this dressing, maybe it was the fresh ingredients, or the fact that I got to sit and mix it myself while giggling like a nerd, but it was so delicious. Tangy, fruity, sharp. Once again, I looked forward to eating my salad because of this vinaigrette. I'm telling you, homemade is the way to go!

Homemade Balsamic Vinaigrette

Ingredients

1/2 olive oil (I actually probably did about 1/3 cup to lighten it up a bit)
1/4 cup balsamic vinegar
2 crushed cloves garlic
salt and pepper to taste

Directions

Combine all ingredients and mix until well combined. Toss in salad. My favorite salad for this dressing has diced apples, cranberries, toasted almonds and diced sharp cheddar cheese. Totally delicious.

Monday, January 31, 2011

Sweet Potato Fries with Honey-Cayenne Glaze


Since discovering sweet potato fries, I've become a bit obsessed with them. If they are ever offered at a restaurant, I have to order them, it's a compulsion, I don't have a choice.


A few months ago, I went to a fun and different restaurant in New Hampshire called The Friendly Toast. They had a great menu, full of items that would satisfy the carnivore and vegan alike. But the first thing that caught my eye was their sweet potato fries glazed in a spicy honey. They were to die for! I took the majority of my sandwich home in a box, but there was not a fry to speak of by the time I was done with them.

A few weeks later I did my best to recreate them. I'll never make sweet potato fries as good as restaurants can, simply because I can't bring myself to fry them. However, the honey glaze was just as good. A sprinkle of cayenne in about two tablespoons of honey, and you have yourself a different and delicious way to eat sweet potatoes. Give it a try!

Sweet Potato Fries with Honey-Cayenne Glaze

Ingredients

2 Sweet Potatoes, peeled and sliced into wedges
2 tablespoons olive oil
sea salt and pepper
2-4 tablespoons honey
1/2-1 teaspoon cayenne pepper, depending on how hot you want it

Directions

Toss sweet potato wedges, olive oil, salt and pepper until coated. Roast on a cookie sheet at 375 for about 20 minutes, or until soft and browned. Mix honey and cayenne pepper. Plate serving of fries on a plate and drizzle with desired amount of honey.

Serves 4

Wednesday, January 19, 2011

Cheesy Broccoli-Cauliflower Casserole with Rye Crumb Topping


I'm not sure why, but I always feel really accomplished when I can serve an entire, satisfying meal without any meat. Don't get me wrong, I love my steak and chicken as much as the next carnivore, but I like to prove to myself that it's not imperative to a good meal.


I found this in my Cuisine at Home magazine, a magazine I've come to love. It's a casserole full of veggies, cheese, rice and the wonderful flavors of rye bread. It's a unique, but healthy and delicious casserole that will not leave you wishing for a burger. My husband isn't a huge fan of caraway, so I will probably leave it out next time, but I will make this again. It would work as a main dish, or a lovely side dish for guests or a potluck. I do love to see my family eat their veggies!


Cheese Broccoli-Cauliflower Casserole with Rye Crumb Topping
By Cuisine at Home December 2010

Ingredients

For The Casserole:
3 cups broccoli florets
2 cups cauliflower florets
2 cups cooked white rice

For The Crumb Topping:
1 1/2 cups fresh seeded rye bread crumbs
2 TB unsalted butter, melted
salt and pepper

For The Sauce:
3 TB unsalted butter
2 TB minced shallots
1 TB caraway seeds
2 TB all-purpose flour
2 1/4 cups milk
1 TB Dijon mustard
2/3 cups smoked Gouda
2/3 cup shredded Emmental (I used Cheddar) cheese

Directions

1. Preheat oven to 375.

2. Blanch broccoli and cauliflower in a pot of boiling salted water, 3 minutes. Drain and immediately shock in ice water; set aside.

3. Combine crumbs with melted butter in a bowl until coated, then season with salt and pepper.

4. Melt 3 TB butter in a large saucepan over medium heat. Add shallots and caraway seeds; cook until seeds are toasted, 3 minutes.

5. Whisk in flour, coating shallots; cook 1 minute. Whisk in milk and Dijon, cooking until sauce slightly thickens, 8 minutes (do not boil). Add Gouda, stir until melted. Add Emmental or Cheddar; stir until melted. Add Emmental; stir until melted. Season sauce with salt and pepper.

6. Stir broccoli, cauliflower, and rice into sauce. Transfer mixture to a 2 quart baking dish.

7. Sprinkle crumb topping over casserole, and bake casserole until bubbly, about 35 minutes. Let casserole rest 10 minutes before serving.

Per Serving: 283 cal, 15g fat, 28g carb, 3g fiber

Serves 8


My kids got new aprons for Christmas. After several attempts, this is hilariously the best picture we could get.